
Draw a cape – A Bit-by-Bit Guide
Draw a cape Layered, attracting only 6 simple tasks! Capes are a dress that has fallen into neglect as of late. Before, they were utilized by the rich and honorable; however, presently, they are just utilized at exceptional events or by superheroes or vampires in films. You may also learn many things cartoon drawing, scary drawing, cartoon drawing, cute drawing, how to draw car flowers drawing, cute drawing, puppy drawing, and dog drawing.
Even though they may not be utilized by everyday individuals nowadays, they are still entirely conspicuous because they are utilized in numerous films and different media types. Planning your cape can be an extraordinary method for restoring the class related to these pieces of clothing. Determining how to draw a cape is an excellent method for making it happen. If you have any desire to do that, then, at that point, you’ve come to the proper instructional exercise! Our bit-by-bit guide on the most proficient method to draw a cape will show you how fun and simple it may be! The most effective method to attract a cape 6 stages
The most effective method to draw a cape – we should begin!
Stage 1
the most effective method to draw a cape Stage 1 The piece of clothing we will attract this helper on the numerous professional form to remove a cape is genuinely beautiful and worn by a baffling sorceress. The cape has a high, wide collar and adjusted shoulder braces. We will attract the start of the two angles in this initial aide step. Utilize bent lines for the sides of the turtleneck that flare out, then add overlay lines within the focal point of the neck. Then you can draw the shoulder brace on the left. It will likely be a turtle shell with a meager edge and an adjusted top. Whenever it’s drawn, it goes to stage 2!
Stage 2 – Presently draw another shoulder brace, and the fastens
instructions to draw a layering stage 2 To proceed with this cape drawing, we will draw the other shoulder brace, which fastens at the front of the cape. The other shoulder brace will go to one side, and to show the point of view, it will show up marginally more modest than the past one. Next, we will draw the pins. These look very smooth with a little twirl on their inner sides and, afterward, bent lines that are wings on the outer sides. That is supportive of now, so when you’re prepared, we can continue toward Stage 3 of the aide.
Stage 3 – Draw the left half of the layer
instructions to draw a layering stage 3 Since you have the yoke and pictures set, we’ll begin counting the cloth for the projection in this phase of our how-to remove a Cape focus. Define bent boundaries for the passed-on side of the cape and attempt to make it look a piece wavy so it will stream more. Then, at that point, you can make it seem as though you are streaming texture by adding somewhat bent lines inside the texture. You will then, at that point, be prepared to attract the opposite side of the layer in the following stages.
Stage 4: Draw the beginning on the opposite side of the layer.
Instructions to draw a layering stage 4 The left half of this cape configuration was hanging very straight, very statically, and in this step, we will show the right side streaming. To begin, draw a bent, wavy line emerging at an exact point from the highest point of the layer. Then, define a couple of additional bent boundaries close to the foundation of the left half of the cape. As the reference picture shows, this middle area will have square segments. There will stay a clear segment on the cape, yet we’ll fill it in with the last subtleties in the following stage of the aide!
Stage 5 – Add Last Subtleties to Your Layer Drawing
the most effective method to draw a layering stage 5 You are prepared to finish attracting this fifth step of our how-to Draw a Cape guide. In this step, you will add the remainder of the layer and the last subtleties. Utilizing more bent lines, you can add the cape’s last segment to associate the cape’s different sides. You can add any last subtleties or thoughts you need whenever they’re drawn! There are numerous good thoughts that you could choose, and one of those thoughts is to draw somebody with a cape. What sort of individual? How about this cape look great on? You can likewise draw a fancier foundation or garments, so how can you complete it?
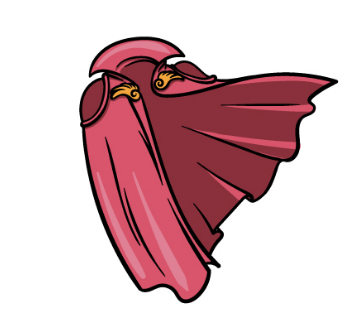
Stage 6: Wrap up drawing your layer with a variety
of the most effective method to draw layering; stage 6. You have now arrived at the last step of this drawing layer! This last step will be to get done with astounding varieties. In our reference picture, we picked a few decent rich tones to polish it off. We involved hazier shades within the cape.